Last Updated on April 11, 2024 by Real Men Sow
Microgreens are small plants which are grown indoors and harvested in a span of just a few weeks. Growing microgreens in the winter is possible with the right equipment, light sources and knowledge about how to grow them.
Growing microgreens in the winter are not as easy as it sounds because of the cold temperatures. There are many factors that need to be taken into consideration while growing microgreens, such as light sources, equipment, and knowledge about how to grow them. The first thing that you need to do is find out what kind of plants they are—annual or perennial. Annuals will die when they get too cold, so you should make sure that your plants don’t get too cold if you want them to grow back next year.
Mixing Microgreen Seeds
Although you can mix microgreens seeds and sow them at the same time, different seeds require different times to germinate. Also, different seeds grow differently at the harvest stage differently so it’s best to keep similar seeds in a mixture.
You could mix cabbage, cauliflower, and kale seeds together in a mixture, but it would not be wise to mix peas and sunflower seeds in the mix. It is a good idea to sow the same size seeds simultaneously.
Equipment for Producing Microgreens in the Winter
Microgreens can be grown without any additional equipment beyond what a regular gardener would need. Many people of a certain age will recall growing mustard and cress in blotting papers in a saucer at school. Those were microgreens. Blotting paper, that’s me!
Seed trays are required, and they should be both solid and hollow. You will need a hand sprayer, or a watering container with fine roses. However, you can also use an indoor watering pot. Warm place that could be used as a heating propagator or windowsill.
Compost for Producing Microgreens
The seed is the main source of energy for the initial growth of the plant. Therefore, you don’t need to use a lot of nutrients in your compost. For consistent results, it must be sterilised. If it is not sterilised, homemade compost will contain viable weed seeds as well as microgreens and fungal spores. Microgreens can become contaminated by mould and fungus.
It must also be porous and light. A compost that retains water is not as good as one that drains easily. It is easy to make a multi-purpose compost that has been sifted (use a garden riddle), and it is cheap. You might be able to get better seed composts, but they are more expensive. It all depends on what you have and how big your plants are.
Sowing Microgreens in the Winter
Hygiene
The potential for disease is always present in seedlings, especially fungal disease. Therefore, it is crucial to be clean when sowing in pots and trays. It is even more important to avoid fungus when using microgreens because of their dense seeds. It has never been an issue in my experience.
Sterilise Seed Trays
After washing the tray, soak them in warm water for five minutes. Then add some bleach to sterilise them. The bleach should be added at 150ml for 45 litres or half a cup for 10 gallons. Ideals are an old bin or a tray. You can add the trays one by one so that the solution doesn’t get all over them. Jeyes Fluid and Armillatox are alternatives to bleach. Rinse well and dry.
Filling the Seed Trays
The compost mixture should be poured into the seed trays and tamp it down. I use a block made of an offcut from 3×4 wood. It doesn’t matter if the block is rock-solid or firm.
Initial Watering
This requires some judgement. You can sit the tray in water for 10 minutes and then drain on a gravel tray for a few minutes but it takes time, or just water sparingly using a fine rose on the can. However you do it, you want the compost damp but definitely not soaking wet.
Sowing the seeds
Sow the seeds thicker than usual. It is a good rule of thumb to place the seeds in a space equal to their size. This will vary depending on how many seeds are available. As much as possible, sow evenly across the entire surface.
You can mix seeds from previous years if you have leftover seeds. You can also sow half of a tray if you don’t have enough seeds.
Soaking Seeds
Pre-soaking large seeds such as sunflowers, beans and peas overnight in warm water at room temperature can greatly increase germination rates.
Commercial growers soak their seeds in water that has been treated with food-grade hydrogen peroxide to prevent diseases. It is a bit too much for home gardening. You can add one teaspoon of cinnamon to your water for a more natural method. Cinnamon acts as a natural fungicide.
Press the Seeds
It is important that the seeds contact the compost properly to ensure good germination. Germination is easier if you press them down, but not bury them.
Covering the seeds
It is not necessary to cover the seeds in the same way as you would normally. For smaller seeds, a light covering is best. You can use vermiculite as a finely ground seed compost. It is more dusty than a cover. For larger seeds, no covering is necessary.
Water Lightly
For smaller seeds, a light misting with a spray canter may be helpful. This is done primarily to settle the seeds’ covering.
Growing Microgreens in the Winter
Germinating Microgreens
Microgreens can be treated just like regular seeds. Cover the tray with a propagator cover. However, commercial growers often find that they germinate better when the trays are stacked so the seeds are pressed down. Although the top tray does not contain seeds, it is filled with compost. A commercial grower even placed a slab of concrete in the top tray!
Germination is dependent on temperature. The ideal temperatures for germination can vary depending on what is being grown, but it is a good compromise to provide bottom heat between 15-20°C.
After the second day, check it daily, or twice daily. If necessary, mist or lightly water the seeds. When most of the seeds are germinated, take them out of the stack. This can happen as soon as the third day, but it may take up to a week.
The seedlings will turn yellow once they are taken out of the stack. However, they will start to green up quickly. They usually grow in 24 hours.
Growing Microgreens in the Winter
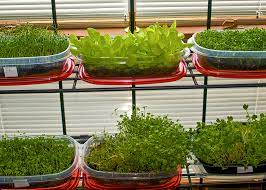
Winter is more challenging than summer for microgreens. It is simple enough to grow microgreens indoors, where there is warmth. Once germinated, seedlings require light.
They will require additional light between the end of October to the beginning of March, when the days are shorter. Grow Lights are relatively affordable and easy to use, even on a small scale. You can find more information about day length on the site.
Harvesting Microgreens
It is easy to harvest your microgreens. Simply cut the seedlings above the soil line with a pair of sharp scissors. You don’t have to use the entire tray at once. Just cut what you need, and let the rest grow.
