Last Updated on August 16, 2023 by Real Men Sow
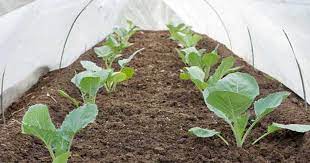
A row cover tunnel can be used to extend the growing season, and protect plants from hail, cold, wind, hail and other threats.
There are many ways to cover a garden row with a row cover tunnel. You can use many materials and different methods. A row cover tunnel requires a row, cover and tunnel. It sounds simple, but let’s take it to step by step.
What To Protect With the Row Cover Tunnel And Why?
You can protect a single row, a raised garden bed or a vegetable patch. Any area that is used for growing plants or requires protection. Protecting a row from frost in spring might be a good idea. A simple row cover tunnel is sufficient for most of the population. Protective netting is better than pesticides that can kill all insects as well as the bird population.
One tunnel can cover two or three rows. You should be able access the plants from both ends of the row cover tunnel. Although it is possible to cover a large area with one cover, it’s not the best way of protecting crops. It is better to cover at least 4 feet at a time.
What Covering To Use
It is very important to consider the function of your covering material. Although a blanket is suitable for almost everything, it’s not the best cover. Thicker fabrics are best for wind and frost protection.
Frost protection blankets come in different densities. Frost protection blankets come in different densities. They provide more shade and offer more protection. When you think of frost protection, plastic might be the first thing that comes to mind. Plastic is a good choice for frost protection. However, plastic can also be overheated.
Protecting against insects is easy with mesh or netting. It all depends on what insect you are trying to protect. The netting should be extremely fine for carrot flies. Any dense netting will provide some wind and intense protection from the sun.
Protecting plants and pollinating them with netting can be a great way to protect them from predators and birds. Deer don’t like flattering netting for some reason. They are often unable to get in, despite being able to do so. Bird netting can be purchased at most hardware and garden stores in a variety of sizes and densities. It is not very durable so make sure you get the best price.
Hoops For The Row Cover Tunnel
You can make the hoop house from different materials. The material’s strength will depend on its use and the cover it is covered with. The 9-gauge is great for bird netting and lightweight covers like a galvanized vine. We used side cutters, also known as diagonal cutting pliers, to make it easy to straighten and easy to cut.
For heavy cover and in windy areas, you will need stronger material. A 4- or 6-gauge galvanized steel wire is a great choice. Most commonly, 1/2-inch and 3/4-inch PEX pipes are used. You can attach the hoops by placing metal stakes on the ground. Then slide the pipe ends onto them. Or push the pipe ends into the ground.
If you are planning to cover heavy material or if your hoop is larger or higher, a ridge pipe or rope can be a good idea. However, it is not necessary for most netting covers. The length of the material used to make the hoop will depend on how wide the bed is and how high you want it to be. For stability, some of the material will be buried in the ground.
Securing The Cover
It is crucial to secure the cover tightly. It is better to have a cover that doesn’t move in the wind than one that does. You don’t want loose netting to become a trap for small and large animals. You can either clip the cover to the pipes or attach it to the ground. All types of clothespins are useful, from simple clothespins to heavy-duty garden pins.
- Boards – The material can be rolled up and attached to the board in windy areas.
- Rocks – Our garden is filled with rocks because we use so many covers.
- Sandbags – are frequently used in commercial settings. Making sandbags can be a good idea if you don’t have any rocks or boards.
Also, don’t use stakes or ground pegs. Because they are more expensive and can be easily torn off by the wind.
For Hail Netting
Hand-made clips work well. You can make them in two different versions. Cut a pipe that is one inch larger than the hoop’s to make two pieces. One cut should be made lengthwise. Holding one end of the cut between two plates, heat the material with a heat gun. Once the plastic is heated, cut it into a shape as in the image above. This will also allow the clip to be attached to the hoop easily.
You can also make two cuts to remove about a quarter inch. Then, you can round the corner using a knife to ensure that the cover material is not damaged. Use what you have available, and only do what works for you.
